Microsoft 365 Groups
What are Microsoft 365 Groups?
Microsoft 365 Groups, allow you to choose a set of people that you wish to collaborate with and easily set up a collection of resources for those people to share. You don’t have to worry about manually assigning permissions to all those resources because adding members to the group automatically gives them the permissions, they need for the resources your group provides.
Those resources include:
- Shared inbox - Where the conversations you traditionally have in your distribution lists take place. This shared inbox is fully searchable, so it creates a living archive of the group's messages. Newcomers to the group can search or scroll back through the history to get up to speed quickly on what's been posted in the group previously. See: Have a group conversation in Outlook.
Tip: If your users still want the group messages to appear in their personal inbox, as they did with the distribution list, all they need to do is subscribe to the group by clicking the Membership button on the ribbon in Outlook.
- Shared files library - Your group has a SharePoint files library where your users can store, share and collaborate on documents, workbooks, presentations, images or any other kind of file they need to work on.
Please note:
It is important to recognise that any files you save in this area are accessible by everyone in the group including any external guests you have invited to the group.
- Shared calendar - Your group gets a shared calendar to post events related to the group. Each member who has subscribed to the group is automatically invited to events posted to the calendar so those events can also appear on their personal calendars if they wish.
- Shared OneNote notebook - The group automatically has a shared OneNote notebook where group members can collect and collaborate on information. Many groups use the notebook to create a living wiki with frequently asked questions and other resources.
- Guest access - You could add external contacts to distribution groups before, but all they got was email. With groups you can offer guests access to email conversations, files and even the shared OneNote notebook.
- Content is discoverable - Groups in Outlook are public by default which means that they are easy for other people in your organization to discover and join or review the materials in the group. If the content of the group is more sensitive you can switch the group to private, which hides the contents from non-members and requires the group owner to approve any requests to join.
Microsoft 365 Groups can be accessed through mobile apps such as Outlook for iOS and Outlook for Android.
Group members can send as or send on behalf of the group email address if this has been enabled by the administrator.
Office 365 groups is a direct replacement for distribution lists we currently use.
To create a Microsoft 365 Group you can raise a request for the IT Helpdesk via LJMU Assist. The IT Helpdesk are also able to add large numbers of users to Microsoft 365 Groups should you need to.
Listserver does not work with Office 365 groups.
Adding members to your Microsoft 365 group
1. Open Outlook for Windows.
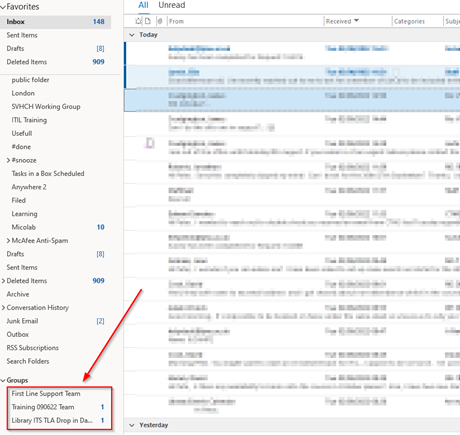
2. Under Groups in the left folder pane, select your group.
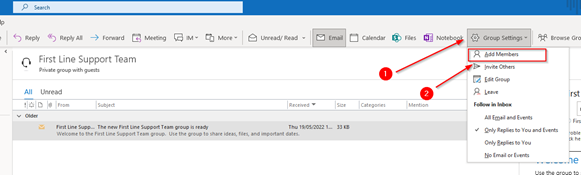
3. Using the Group Setting option on your ribbon at the top of your screen, select Add Members.
4. In the Add Members box, search for people within your organisation either by typing their name or email address, and then selecting the appropriate name in the box below to add them. If the person you are adding is external to your organisation, you’ll need to type their full email address.
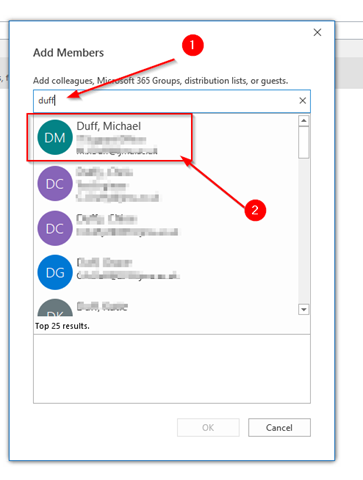
5. Click OK.
Note: You can't edit group membership using the Address Book. If you try to add or remove members using the Address Book, you may see an error.
Creating a Group
A 365 group must be created by the helpdesk using LJMU Assist.
To create the group, you will be asked for the following information,
- Name of the group.
- Description of the group.
- Who is the owner of the group. It is recommended two people are added.
- Do you need members adding to the group?
- The group email address.
- Do you want the group to be visible in the address book?
- Is the group to be public or private.
- Do you want to allow people from outside to be able to email the group?
Please note:
Content in a public group can be seen by anybody in your organisation, and anybody in your organisation is able to join that group. Content in a private group can only be seen by the members of the group. People who want to join a private group must be approved by a group owner.
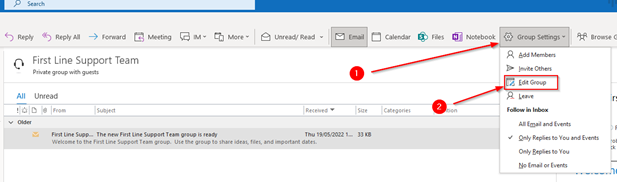
Group Owner Group Settings
The owner of a group can also edit the groups settings via Outlook. To do this as before select the group you wish to edit in the left folder pane. This time using the Group Settings option on the ribbon at the top of the window, select Edit Group.
You’ll now have the following options:

1. Privacy. Public or Private.
Content in a public group can be seen by anybody in your organisation, and anybody in your organisation is able to join the group. Content in a private group can only be seen by the members of the group and people who want to join a private group must be approved by a group owner.
2. Subscribe new members so they receive group email in their inbox.
We would recommend this is ticked so the user has the same experience as they are used to with Distribution lists.
3. Let people outside the organisation email the group.
This needs to be ticked if this is required. If the group has only just been created it will take a couple of hours for the group to be replicated around the network and mail routing to work.
4. Add members to the group.
Add new people to your group by adding their name or email address here
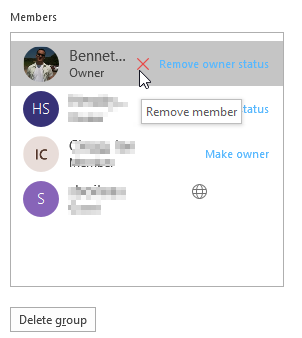
5. Remove a member from a group.
Only group owners can remove members. To do this hover the mouse pointer over the name of the person you wish to remove. When you do this a red X will appear click the red X to remove that person from the group.