Sending a document to print
What is "MyPrint"?
All printers across the University share a single queue called MyPrint. This allows a document to be released at any printer, no matter where it is. For example, you may be working in Redmond Building, but want to release the document in the City Campus Library (or any other LJMU building) - MyPrint allows you to do this, up to 24 hours later.
Whether you want to print in black and white, colour, or a mixture, single or double sided, simply set the printing properties and then send the document to print.
Colour and Mixed Printing
The default setting is double sided, black and white output. If you have a mixed document (i.e. only some pages of it have colour) and choose to print in colour, you will only be charged the colour printing rate for those pages that have colour.
Example
A 100 page document is printed using the colour settings. Only 2 pages are in colour, and the rest is black and white. The user will be charged for 98 pages of black and white printing, and 2 pages of colour.
Sending a document to the printer queue
The step-by-step instructions below are for standard networked LJMU Windows PCs (including LJMU Anywhere laptops & tablets). You can print from any device using the mobile print options.
Connecting to the MyPrint printer queue on an LJMU PC
On your desktop PC IT Services will change your default printer to the new MyPrint queue soon after the new printer is installed. Before this change happens, you will need to connect to it manually:
- In the LJMU AppPlayer (look for the green button on your desktop), search for and run “Change Network Printer”
- Select your location and “New HP MyPrint” printer
- Then click Connect.
- The Printer will be listed as "myprint on print"
Networked Mac users
Specific instructions will be provided soon – for now please use the mobile print options.
Other PCs and Mac laptops
Use Web Print (see mobile print options).
LJMU Windows PC users – step by step
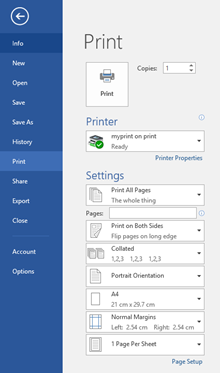
- From within an Office 2016 document, click File then Print.
- The Print dialog box will appear, similar to the one shown below, alongside a preview of the printout.
- Adjust the print properties if required (as described below).
- Click the Print button
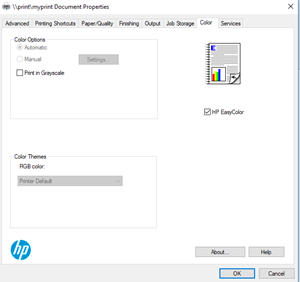
Adjusting the print properties
Make selections in the Print Dialog and in Printer Properties in your application.
Here are some of the things you can choose (varies with the application):
- The number of copies required
- Print all or some pages
- Landscape/portrait orientation
- Double-sided printing on/off (on the Finishing tab)
- Colour (Color tab)
- Staples (Output tab)